How to Point-and-Shoot: Birds
Every bird watcher, amateur or expert, carries two key items while out birding – a binocular and a notepad. Without these, you cannot see a bird nor record it. If you do see a bird that you can’t identify without the aid of binoculars, it becomes hard to identify it later without noting the details on a paper. These were the primary tools used in the past by most famous birders, and are still the precious possession of any bird watcher.
Nowadays, a new age of bird watchers is emerging; one that not only uses their eyes to sight a bird, but also a digital eye to capture it. This is the age of bird watchers with rather sophisticated tools – cameras. And just like cameras, bird watching has become more and more popular amongst people. However, when it comes to research, a camera is still a secondary option over the primary binoculars and notepads. This is rather debatable, as someone might consider camera to be more reliable when it comes to providing a proof for the existence of a bird in the area in question, or an answer to the identity of an unidentified bird. But while photographing a bird, there are many mistakes bound to happen, such as the camera failing to focus, thereby delaying the opportunity to even catch a glimpse, or the image being too poor in quality. If you point your binoculars, there’s a higher chance that you will see the bird to note its characteristics and behaviour for future reference. Therefore, although a camera is a helpful tool, it is still optional when it comes to research. Ideally, making bare-eyed observations and noting the identity of the bird (including the number of birds observed, behaviour and the habitat) first, and then photographing the bird (if possible) is a good scientific approach to bird watching.
Nowadays, a new age of bird watchers is emerging; one that not only uses their eyes to sight a bird, but also a digital eye to capture it. This is the age of bird watchers with rather sophisticated tools – cameras. And just like cameras, bird watching has become more and more popular amongst people. However, when it comes to research, a camera is still a secondary option over the primary binoculars and notepads. This is rather debatable, as someone might consider camera to be more reliable when it comes to providing a proof for the existence of a bird in the area in question, or an answer to the identity of an unidentified bird. But while photographing a bird, there are many mistakes bound to happen, such as the camera failing to focus, thereby delaying the opportunity to even catch a glimpse, or the image being too poor in quality. If you point your binoculars, there’s a higher chance that you will see the bird to note its characteristics and behaviour for future reference. Therefore, although a camera is a helpful tool, it is still optional when it comes to research. Ideally, making bare-eyed observations and noting the identity of the bird (including the number of birds observed, behaviour and the habitat) first, and then photographing the bird (if possible) is a good scientific approach to bird watching.
Bird photography is more cherished by people than reptile or insect photography. This turns this fine hobby into a competition amongst bird photographers, as everyone tries for that perfect shot. But only a photographer knows how challenging it is to capture these moments with optimal results. After getting my first digital camera, it took me several years to get a hang of photographing birds, and even today, I fail most of the times to capture a decent photograph. Take my reflexes which are probably too slow to follow a bird’s movement and multiply it with the slowness of a point-and-shoot camera, and you get a really bad image of a really common bird, yet sometimes we can capture really satisfying photograph with such cameras. In this article, I will talk about how to photograph birds using a point-and-shoot camera through a little bit of experience I have had with this subject.
Knowing one’s camera is very important. Point-and-shoot cameras are notorious when it comes to photographing distant objects, and when that object is a hyperactive bird, there are more chances of missing that right shot. Cameras with more than 10x optical zoom (ideally, 15x+ is better) and more than 7 megapixels works well for bird photography. In case of optical zoom, as the magnification increases, the image quality considerably decreases. Therefore, a bird image taken real close at 1x zoom shows more details than that taken at 15x since at higher zoom, light reaching the sensor decreases, rendering darker and noisy images. This is due to the small size of the sensor, which is what is primarily responsible for low grade images with many Point-and-shoot cameras compared to dSLRs which contain a large sensor. But worry not, for this isn’t as important as the weather is when it comes to bird photography!
Some point-and-shoots come with an extra, adaptable Tele-Converter (TC) lens which has to be bought separately. A TC lens optically magnifies an image, just like a magnifying glass. Such lenses give an extra 1x or 2x reach which aid in photographing distant objects. From my experience, using them in dull weather, especially on an overcast day or before sunrise and after sunset is tough. It is also a pain when it comes to screwing it onto the camera and removing it whenever not required. But it is excellent to achieve a subtle, plain background as it greatly narrows the depth of field. Images might turn too dark or soft with the use of TCs, but under ideal lighting, they can yield great results.
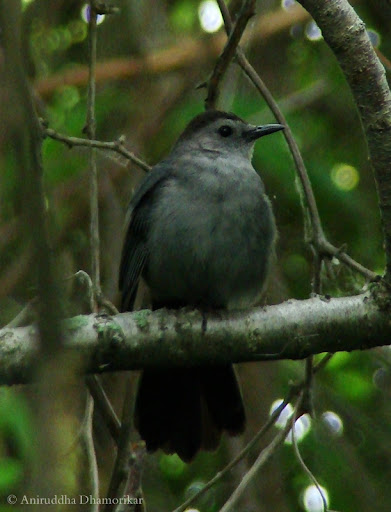
 |
| 1. Tree Swallow Exif: 10/3200sec F4.5 ISO100 at 78.00mm, TC |
The above image of a Tree Swallow was made using a 1.7x TC attached to Sony H7 camera. It looks a little soft, but sharp enough to see details on the swallow’s feathers, with a rather subtle background of tall grass close behind. This is an ideal example that shows the effect of a TC, but what really kept this image from being too bright or too dark is the weather. Tree Swallows have highly reflective feathers, which shine under harsh sunlight. On that day, the light was well diffused to bring out the true colour of its feathers.
So you can see, weather plays a crucial role in point-and-shooting birds. Except in a few cases, a bright sunny day is mostly preferred over a cloudy sky. If it is too dark, you may have to increase the ISO, and anything beyond 400 (in case of my camera, 200) will lead to higher noise. Although this can be avoided by considerably lowering the shutter speed, this is likely to amplify the camera shake, leading to an out-of-focus photo. Let’s focus on the ideal conditions for now.
 |
| 2. Cedar Waxwing Exif: 10/5000sec F5.6 ISO200 at 78.00mm, TC |
This image of Cedar Waxwing was made one early evening in March when the snow was slowly starting to melt. It was one of the rare moments when the sky was clear, the light perfect and the bird cooperative. Under such conditions, I keep the ISO under 200 and increase the shutter speed to be able to capture any movement, especially the flight. If the bird is curious, such as this Waxwing that came pretty close to check me out, stand still or stoop down while aiming for the bird. Any sudden movement can scare it away and if it is a flock, the entire flock will vanish in seconds.
Before we dive into the particulars of photographing birds, it is important to learn a few things as a dedicated naturalist and a concerned photographer. You may come across an opportunity to photograph a rare bird. It can be overwhelming to sight one, but it is important to keep our excitement from disturbing the bird. By keeping your movements slow, try to get photographs from as far as possible and leave it alone. Also, it is not recommended to reveal the location of an uncommon or rare bird to others (except perhaps a researcher) because such subjects are like magnets, and the more people flock to see it, more likely it is that the bird is disturbed from its preferred habitat. Likewise in case of nests, which one is more likely to stumble upon in the wilderness, always try to keep as much distance as possible so that the parent birds do not consider you a threat. In case of some birds, they will abandon the nests, eggs or even hatchlings if disturbed! You can easily photograph the parents feeding the chicks and observe how they take turns to incubate eggs from far a safe distance without the use of flash. If you accidentally stumble too close to a nest, always photograph without the flash. Using direct flash on hatchlings is strongly discouraged; hence always make sure to keep it off, even if it affects the quality of the photograph. It is also wise to keep the location of nests secret, as they are also likely to attract public attention. These are a few things any nature photographer must remember at all times.
Now let’s talk about a few main pointers while you’re out looking for birds. It is better to wear drab clothes that match the shades of earth – not super camouflaging clothes per se, but something that doesn’t make you stand out from the background. Keep quiet or talk in whispers so that you don’t spook the bird accidentally. If you see a bird perched nicely, but is too far out of the reach of your camera, take a few record shots before moving in. Don’t rush. Keep a low profile and make use of any shelter – a tree, bushes or thick undergrowth, so that the bird doesn’t notice you.
 |
| 3. White throated Kingfisher Exif: 1/160sec F4.5 ISO80 at 78.00mm, TC |
The White-throated Kingfisher is a common bird of India, but they are very wary of humans therefore rather difficult to approach closer. One day, I was fortunate to see one perched on a Mango tree at the edge of a lake. I decided to stalk closer by hiding in tall grass. I took the cover of a large tree just behind its perch and made this photograph. This is the closest I could get to a Kingfisher. Although I am not satisfied with this photograph, thanks to the wayward branch that blocked the bird and the out-of-focus grass blade, I am glad I achieved eye contact with the bird (about which we’ll talk a little later). Although all these steps are easily learnt on occasional bird watching trips, as a photographer, you should always have your camera ready. Change the settings if you’re using Manual Setting before getting down to stalking. Keep your finger on the Shutter Release button and go for it. Also, don’t forget to remove the lens cover beforehand, because it is likely to happen in all the excitement!
P Dark weather poses a challenge to photograph birds using a point-and-shoot camera. It can be avoided by keeping the ISO of 400 or more, which may produce a noisy image, but these can serve the purpose of a record.
 |
| 4. Catbird Exif: 10/800sec F4.5 ISO400 at 78.00mm, No flash |
I photographed this Eastern Catbird on a clear day, but the overgrowth was so thick that light barely reached the understory. Therefore, I had to boost the ISO in order to obtain this record shot. Under such conditions, it is inevitable to avoid image noise, but it is possible to reduce it to a bearable level.
 |
| 5. Spotted Dove Exif: 10/3200sec F4.5 ISO400 at 77.70mm, Flash |
The image of the Spotted Dove was taken under similar conditions under dim light. In this photograph, you might notice lesser noise as compared to the Catbird. This is not because there is less clutter in the image, but because of the use of flash at the ISO at 400, which illuminated the bird and brought out more details. I wish I had taken a photograph of the Catbird with the use of flash, which would have helped rather conclusively that the flash on a point-and-shoot camera is not always useless on far-away objects. I use the flash at +2EV, the brightest flash setting which can be changed under Manual mode.
Although both these birds were pretty close, if not too far, the same technique can be used on birds 10 meters away. But only a strong flash won’t produce decent results, you need to have a lower F number (at about F4.5 to 5) and a slower shutter speed, so that the flash light that bounces back from the object is well received by the sensor in the camera. If the shutter speed is higher, the image is likely to turn dark. This technique doesn’t work while using a TC, since the TC blocks the light from the flash. In such a case, a homemade flash diffuser works well (about which we’ll talk in a few months). The use of flash however does not allow you to use the multiple frame mode.
P I always thought that sharp birds-in-flight images were impossible using a point-and-shoot camera. While this is not the case, it is indeed rather difficult to capture a bird in flight compared to a dSLR camera. If you’re out in the open, chances of photographing birds in flight are more. In order to do so, keep your zoom initially to a minimum (0x or 1x) and focus on the bird. Once you’ve spotted it on your viewfinder, keep tracing its path and zoom in gradually, and shoot away. It’s important to keep the “Multiple/Burst Frame mode” on so that you can capture multiple images per second.
When photographing birds in flight, shutter speed is most important – you don’t want it to be too slow, which will blur the bird, nor too fast, which might underexpose the image. The right shutter speed can be decided under the weather conditions. As always, a sunny day is always perfect while photographing birds in flight, since you can keep a higher shutter speed at a lower F number and lower ISO (ideally ISO 200). However, the position of sun is also important – always try to keep the sun to your back if you need a clear, bright image of the bird, or with the sun facing you, which works best for silhouettes.
Point-and-shoot cameras are not made for birds-in-flight photography because of their auto-focus. Once you focus on an object and press the shutter release button half way, the focus is locked in. Now if the object moves, the shutter speed will shoot only at its area in focus, thereby producing a blurry image since the object is not in the area-in-focus anymore. If you don’t get any image with the bird-in-flight in focus, try zooming out a little, I zoom out at about 10X instead of 15x, since it becomes easier to stalk the bird’s flight (see the image of the Bluebill).
P You will come across many occasions where the bird is sitting prettily on the ground with the undergrowth not too thick – especially near any wetland or coastal areas. If you see birds in such an area, lie down on your stomach and try for a ground-perspective photograph. This technique works well for ground dwelling, wetland and shore birds.
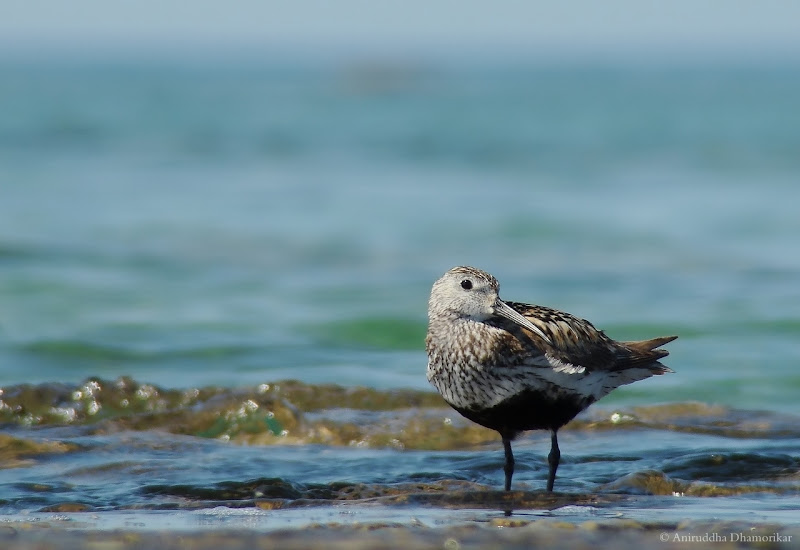 |
| 6. Dunlin Exif: 10/3200sec F6.3 ISO100 at 78.00mm, TC |
This Dunlin was photographed in the same way. By keeping a low profile, the birds are likely to consider you a lesser of a threat, giving you an increased chance to approach closer. Such a technique produces excellent results, especially with respect to subtle out-of-focus fore- and backgrounds. You are bound to get a dirty shirt, but the photograph is worth it!
P There are a few things that bird photographers absolutely adore. One is eye-contact with the bird, and the other a glint in their eye. While these two things are not always in our hands, the birds are often the first to spot you – giving you the eye-contact, and the sparkle in the eye can be captured if the sun is behind your back and facing the bird. The eye-contact is not always necessary, especially for images of birds engaged in some actions – whether calling, eating, or in flight, but if the bird is just standing there, as this super-cooperative Dunlin, the eye contact is catchy, and draws the viewer’s attention.
In case of the glint in the eye, called catch-light, it gives life to the rather dark eyes. Point-and-shoot cameras are not as good when it comes to capturing the minutest details, especially the eye colour, unless you’re too close to a bird. Thus the eye appears dull and underexposed, as in the image of the Tree Swallow, but a catch-light gives a sparkle to the eye, as can be seen in most other images displayed here. Therefore, personally, I find catch-light to give an additional charm to the image as a whole.
P To be artistic is every photographer’s right. If you’re out early during sunrise or late during sunset, don’t be depressed, there’s plenty of opportunity to capture silhouettes of birds! It may not be ideal when it comes to research purpose, but it sure dose make a great cover for the report!
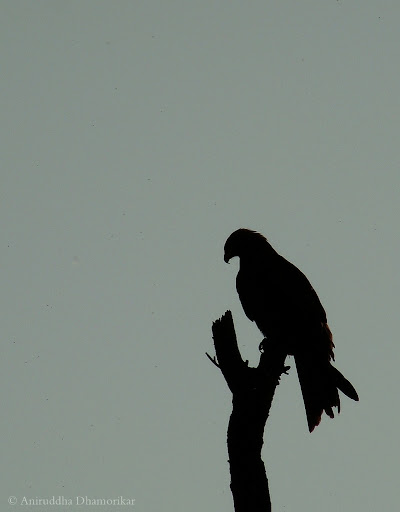 |
| 7. Black Kite Exif: 1/1000sec F8.0 ISO80 at 78.00mm |
The image is of a Black Kite on an early morning. The sun had just risen in the opposite direction; hence I was facing the dark side of the bird. Such images are possible when the background is clear, either against the backdrop of the sky or any distant, light coloured object. It works best for any bird. In such instances, to bring out more contrast, increase the F number (at about F6) and decrease (slower) the shutter speed, at an ISO of about 80 or 100.
P On some excursions, I seriously considered using a tripod, but is it worth it? Most often, a tripod weighs more than any point-and-shoot camera; therefore it is likely to weigh you down on long treks. It is also easier to take hand-held photographs of birds, since maneuvering the camera on a tripod is not as effortless. Tripods are more suitable in conditions where the bird is stationary, since you get more time to compose the image, but the same image can be made without the tripod as well. A tripod is actually ideal for a dSLR camera with a long range lens since it helps you reduce the camera shake.
P There is a trick to bird photography using a point-and-shoot camera. We talked about using a magnifying lens to photograph minute objects in How to point-and-shoot Butterflies article, but in case of birds, you can use a telescope to photograph distant objects. This is called digiscoping. A Spotting-scope works well. Adjust the telescope to where the bird is. Place the lens over the telescope’s eyepiece, and photograph without zooming (at 0x). This trick works well with smaller point-and-shoot cameras since they have a smaller lens diameter. Some Spotting-scopes nowadays come with an adapter to place your camera onto, making it easier to photograph. It works well for birds that are stationary because the focus of the telescope is set to a fixed distance.
P Composing a bird photograph can increase the essence of the image. In my experience with this subject, I have had very little output with artistic compositions, since I almost always try to get the bird in the frame before it flies off, and then consider making compositions.
Only recently, I discovered that point-and-shoot cameras work really well while photographing birds in their habitat. This is the form of composition that many photographers overlook, since their primary focus is almost always the bird, but sometimes, you have to think differently. A bird image that equally emphasizes on its habitat speaks a lot more about that bird than a plain portrait of the bird. It is here that you can practice your artistic skills – by considering the weather conditions as well as the type of habitat.
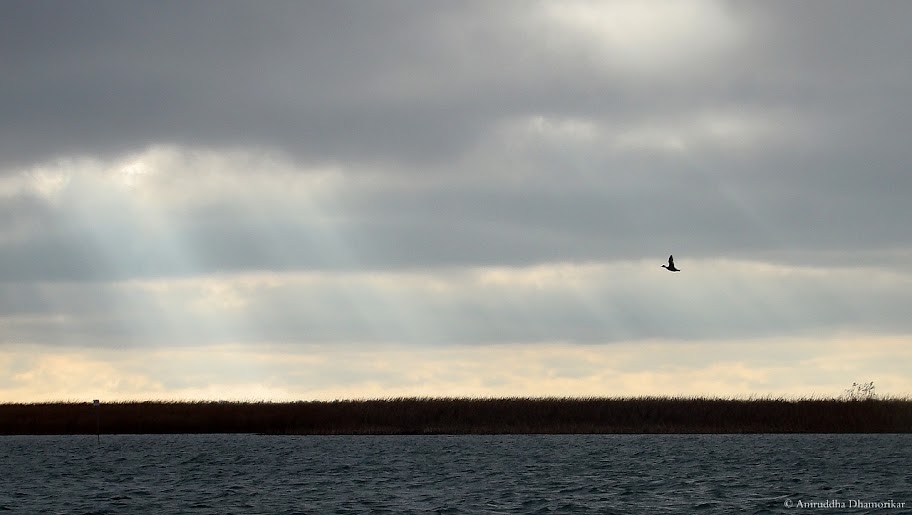 |
| 8. Bluebill Exif: 10/5000sec F4.5 ISO80 at 19.00mm |
Point-and-shoot cameras, thanks to their wider range of zoom (from 2.8 to 78mm on my Sony H7) can be used to take wide-angle photographs. This means that you can have a sharp background along with the object you’re actually focusing on (here, a bird). Instead of zooming in, try zooming out (10x or less), and use the multiple frame burst option. This habitat photograph of a male Bluebill was taken similarly from a stationary boat.
When it comes to bird photography, you don’t have to travel far and wide, unless you’re looking for a specific bird, for you’ll find them all around you. One easy way to attract birds is to put out bird baits. Bird baiting attracts a variety of birds – from small passerines to raptors. Some professional photographers have also created natural perches with bird food on them to get excellent photographs. You can also visit local parks where birds are more tolerant to the people around.
Lastly, practice and practice! Photograph birds from your balcony or in your backyard – even photographing the commonest sparrows and crows will make you better at it.
 |
| 9. Canada goose gosling Exif: 10/4000sec F5.0 ISO80 at 78.00mm |
In Canada, I had a great opportunity to photograph Canada Geese, which are very common and very people tolerant. It was with these birds that I practiced in my free time, trying out different compositions and tricks. During a round-up of a few hundred geese for bird banding at a local park, I photographed this gosling as it shook its head, protesting our presence.
Bird photography is not always about the pleasure of viewing. Many photographers have made images that have made a long lasting impression – not only as a piece of art, but also as a startling reminder that we need to protect them. The value of bird photography is in wildlife conservation and research, perhaps more than it is on the wall. It is a means to record evidence of the existence of birds in cases where the habitat is prone to be razed for development. It is a means to educate friends and families, so that next time they see a bird – they at least know its name. If you practice bird photography, do try to donate your images to NGOs with educational or conservation causes. Many Protected Areas lack photographs in their offices, try to approach them and donate yours, and you will ultimately help someone respect the natural world a little more.
You are a marvelous photographer. I may not have an interest in the technicalities, but I love the results. Thanks
ReplyDeleteI am not much of a photographer so your tips don't make sense to me. I have a problem understanding mechanical things. I do know a lot of people who take pictures and I will remind them to stop by for a look. Interesting article. The pictures are outstanding.
ReplyDeleteThank you Emma! I do try to keep the technicalities as minimum as possible and only elaborate on the methods.
ReplyDeleteYou finally posted this...Thank you :) :) :) :)
ReplyDeletehello, a visual retreat in your photography Mr Aniruddha HD. I am pleased to have a virtual meet with you like this by visiting this interesting website. I have Nikon Cool Pix L810 26x optical zoom 14 MP digital Camera. How is it going to help me? I am really interested in Photography in general and very specifically birds and nature.
ReplyDeleteDear Mr Nagesh, thank you for those kind words. I may suggest you to start with understanding your camera first - its capabilities and drawbacks - by reading the Manual and user reviews, and start with the basic settings. One of the key things to remember is to be patient when it comes to photographing nature.
DeleteI am using a Point and Shoot Cannon (SX 160- inr 12,400))to click birds and animals both still and in motion for the last 6 months. Would like to share some with you. Any email address ?
ReplyDeleteAlso, would like you to post the 'birds in motion' pics you clicked with your P&S.
Prateet
Chandigarh
India
Pratee, my email address is provided in "about author" section. I'm refraining from typing it here for the fear of spammers. I no longer use a PNS, and have taken very few bird in motion photographs - I will share it when time permits. You may also want to refer to a really good website for photography of Indian wildlife - India Nature Watch. There is a lot to learn from that e-group as well.
Delete