How to Point-and-Shoot: Butterflies!
It all started on a trek when I saw a butterfly flaunting false eyes on its wings. I began the quest of identifying it, and discovered many more intriguing ones. Very soon, butterflies became a passion. As a kid I used to chase butterflies to capture them by hands – overlooking their splendor over sheer joy, but then I developed a hobby of capturing them through lens. This was the beginning of excursions to nearby forests, as me and my friends tried to find and identify butterflies by stalking them cautiously with a field guide in hand.
Our fascination for butterflies has come a long way. From the medieval poets and artists to naturalists – all have shared a profound passion for butterflies. It was these pioneers who not only described the butterflies right from their wing venation to the length of the proboscis, but also meticulously sketched every detail of the butterflies they observed. Recently, Vladimir Nobokov, who had described and named a number of butterfly species, was credited for his hypothesis he published in 1945 on a group known as the Polymomatus blues, that he believed originated in Asia, moved over the Bering Strait, and moved south all the way to Chile (Read the full article here). It was vindicated recently, after 50 years since his research, by sequencing the genes of the butterflies he had studied. It is because of such dedicated lepidopterists that we know so much about butterflies.
Today, we might not spend hours sketching every detail of the butterflies we see, but we can photograph them as much as we like, and once you get the hang of it – you’re likely to be addicted. Without further ado, I am going to talk about photographing butterflies using a point-and-shoot camera. To photograph a butterfly, you have to be ready for surprises as well as disappointments. You have to have patience and be persistent at the same time. A butterfly may make you chase after it for hours until it sits prettily on a flower, or just vanish into the canopy.
Many of us cannot resist photographing butterflies if we see one. Often, such photographs only serve the purpose of a memory. Someone may put it up on a wall. If you are a naturalist, your eyes don’t just a see butterfly, but many other features, such as: what is its gender? What is it doing – nectaring, puddling, basking, performing courtship display, mating, laying eggs, migrating, or just fluttering? All of these may be hard to note down, but a single click can serve the purpose. It is in such situations that photography comes to a naturalist’s and a researcher’s rescue.
There are certain terms used in point-and-shoot cameras that need to be looked into, before we talk about photographing butterflies up close. One of them is “macro” photography. Macro means a big (macro) picture of a small (micro) object. The lenses used in point-and-shoot cameras mention “macro” as an option, but it is a misnomer for “close-up” photography. Macro is ideally used for SLR lenses, some of which allow a highly magnified image, where the insect eyes can be captured in great detail. A point-and-shoot merely closes in into the subject and does not offer the explicit details in a photograph. For instance, a photograph of a small butterfly is a close-up shot (taken by a point-and-shoot or a non-macro SLR lens), but a photograph of its eyes is a macro photograph, considering it is a full frame image without cropping or editing. Hence, photographing butterflies by a point-and-shoot is close-up photography. Latest point-and-shoots come with more megapixels that allow capturing better details, but it is still considered a close-up. For more on the difference in close-up and macro photography, visit here and here.
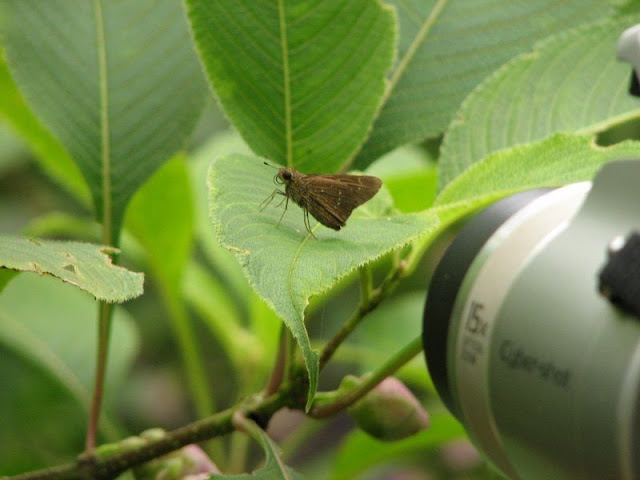 |
| Sony H7 focusing on a Skipper, photograph courtesy Rajiv Lingayat |
Today, we might not spend hours sketching every detail of the butterflies we see, but we can photograph them as much as we like, and once you get the hang of it – you’re likely to be addicted. Without further ado, I am going to talk about photographing butterflies using a point-and-shoot camera. To photograph a butterfly, you have to be ready for surprises as well as disappointments. You have to have patience and be persistent at the same time. A butterfly may make you chase after it for hours until it sits prettily on a flower, or just vanish into the canopy.
Many of us cannot resist photographing butterflies if we see one. Often, such photographs only serve the purpose of a memory. Someone may put it up on a wall. If you are a naturalist, your eyes don’t just a see butterfly, but many other features, such as: what is its gender? What is it doing – nectaring, puddling, basking, performing courtship display, mating, laying eggs, migrating, or just fluttering? All of these may be hard to note down, but a single click can serve the purpose. It is in such situations that photography comes to a naturalist’s and a researcher’s rescue.
There are certain terms used in point-and-shoot cameras that need to be looked into, before we talk about photographing butterflies up close. One of them is “macro” photography. Macro means a big (macro) picture of a small (micro) object. The lenses used in point-and-shoot cameras mention “macro” as an option, but it is a misnomer for “close-up” photography. Macro is ideally used for SLR lenses, some of which allow a highly magnified image, where the insect eyes can be captured in great detail. A point-and-shoot merely closes in into the subject and does not offer the explicit details in a photograph. For instance, a photograph of a small butterfly is a close-up shot (taken by a point-and-shoot or a non-macro SLR lens), but a photograph of its eyes is a macro photograph, considering it is a full frame image without cropping or editing. Hence, photographing butterflies by a point-and-shoot is close-up photography. Latest point-and-shoots come with more megapixels that allow capturing better details, but it is still considered a close-up. For more on the difference in close-up and macro photography, visit here and here.
As a photographer, you must consider all the ways in which you can photograph a butterfly. Let’s take a look at a few important things to consider while photographing them. First and foremost, a photographer is also an artist and the camera is his/her tool. And as Ansel Adams, a well known photographer and an environmentalist once said, you don’t take a photograph, you make it. Nature photography is an art. You can think of many compositions, but ultimately it is up to the subject’s will to make it happen. Yet, artistic photographs of butterflies are what most photographers strive for and to achieve it, you must consider various factors that might make or ruin an image. Such images are possible by getting a butterfly in various poses as they carry on with their daily activities – all you have to do is be in the right place at the right time.
If you are not a mere photographer but a naturalist, you must consider photographing butterflies primarily from two angles: the upper-side of the wings (with wings open) and the under-side of the wings (with wings closed), this helps in identification as well as serves the purpose of a record (as in Picture 1). Although this is not always possible for some butterflies, it is easier to see one with wings open while basking. Some butterflies come in many colour variations depending upon the season. Generally, there are two seasonal morphs– the Dry Season Form, and the Wet Season Form. There are also many transitional morphs, with some species known to have more than three seasonal morphs. Photographs of such butterflies are very important in research. In 2008, I photographed a butterfly called Plains Cupid at Dandeli Wildlife Sanctuary, and the image was used as a record for a research paper “The Polymmatine wing pattern elements and seasonal polyphenism of the Indian Chilades pandava butterfly (Lepidoptera: Lycaenidae) by K. Kunte and A. Tiple” (read it here). This shows how important it is to photograph butterflies from a naturalist’s perspective. It is not just a photograph, but a visual evidence for research.
 |
| 1. Plains Cupid, Chilades pandava Exif: 1/1250sec F3.2 ISO80 at 12.9mm |
But before you go for the shot, you should be on your toes to get close to one. Butterflies are quite sensitive to movement, hence always be slow in approach. If a butterfly flies off and lands again, don’t rush to where it landed, give it some time to settle – it might open its wings to bask in the sun, or start nectaring. Then carefully approach it. While stalking butterflies basking in the sun, try to avoid shadowing the butterfly, because it will quickly fly to find another sunny spot. Always approach from the side or even from the front. There is no skill as such required to photograph them, but if you follow these basic rules, you’ll get pretty close to any butterfly. Yet there are some that are just impossible to photograph. These butterflies are mostly well fed and well energized. It is these butterflies that can tire you out. For such hyperactive ones, make use of the zoom on your point-and-shoot. I have managed to photograph decent images of small Skippers to large Swallowtails using 15x zoom – all you need is stable hands and quick reflexes to follow wherever the butterfly flies and settles, and a considerable distance – not too far, nor too close to the butterfly. Ideally I keep a distance of 10 to 15 feet while photographing such butterflies at 15x zoom.
One must also have the knowledge of when to photograph a butterfly. Time plays an important role in getting a good photograph. Rather, time decides whether you will see a butterfly at all! Like many insects, butterflies need a daily dose of sun’s energy to get their daily activities going, hence, you are bound to see more butterflies on a sunny morning than on a cloudy one. If the day is going to be clear, early morning till noon is the ideal time to photograph butterflies. As the day gets hotter, butterflies become very active, and may not pose late in the day as they would in the morning. This is because they prefer basking in direct sunlight during morning hours. By noon they become quite active, hence finding one then becomes tougher. Although it is not impossible to photograph a butterfly later in afternoon hours, it is quite easy to photograph them early. By evening, most butterflies retire in thickets or in the canopy. If the day is dull in the morning, the butterflies will come out to bask a little later. On an excursion in India during monsoon, I was quite disappointed for seeing absolutely no butterflies. The day was dark and it had rained all night. But just as the clouds cleared the way for sun, many butterflies just appeared out of nowhere.
It is not only the daily schedule of butterflies that is worth noting, but seasons play an even important role in butterfly watching. If you are out to photograph butterflies in the deciduous forests of India in the month of May, you’re likely to see none. But if you visit the same place in the month of March, or from June to October, you’ll be astonished by the sheer number of butterflies fluttering around. In Canada, butterfly diversity is at its peak during summer, starting from April, peaking in July and August, lasting till September. Therefore, if you ever plan out an excursion, make sure you reach early in the morning in the right season. Besides season, the habitat is also important. For instance, you will see very few butterflies in central India compared to Southern Western Ghats, or Northeastern India. In fact, even small distances show a great difference in sightings. I have visited northern Western Ghats in May, and have seen very few butterflies. In the same month in Southern Western Ghats, you’re bound to see several species a day! All these environmental factors make butterfly photography even more challenging and exciting.
Once you’re in the right place at the right time, you should consider the following points to make your picture look better:
P Point-and-shoots work well under natural conditions, but if there is enough light on the butterfly and not on the surrounding plants or ground, the background looks blotchy with dark and light patches. This is because the camera auto-adjusts the light reaching the sensor, giving a strong contrast between light and shadow (as in Picture 1). Hence, unless the light is too harsh – as during afternoon – always use flash. Although natural light is ideal to bring out colours, a flash can bring out more details; in fact, with the use of flash you will be able to see tiny scales on the wings. There are chances that the flash might over-expose the image, hence use the flash at a lower intensity with an ISO of 80 or 200. Some butterflies are sensitive to flash, but after few attempts they get used to it. If not, try to photograph with the flash turned off.
P Butterfly photography can be quite challenging because of the wings. When photographing one with wings closed, try to get the entire body in focus (as in Picture 3). This can be achieved by aligning the plane of the lens to the plane of the butterfly and by increasing the F-number, but you need to be careful, because a higher F-number will create a busy background. I usually keep the aperture around F5 and then adjust the shutter speed and flash intensity. If the butterfly is sitting with wings open, try the same technique, but if the wings are at a slight angle, always focus on the abdomen and the head region. This will keep the camera from focusing only on the outer edges of the wings which may blur the main body.
P Butterfly photography can be quite challenging because of the wings. When photographing one with wings closed, try to get the entire body in focus (as in Picture 3). This can be achieved by aligning the plane of the lens to the plane of the butterfly and by increasing the F-number, but you need to be careful, because a higher F-number will create a busy background. I usually keep the aperture around F5 and then adjust the shutter speed and flash intensity. If the butterfly is sitting with wings open, try the same technique, but if the wings are at a slight angle, always focus on the abdomen and the head region. This will keep the camera from focusing only on the outer edges of the wings which may blur the main body.
 |
| 2. European Skipper, Thymelicus lineola Exif: 10/2500sec F4.5 ISO100 at 4.5mm |
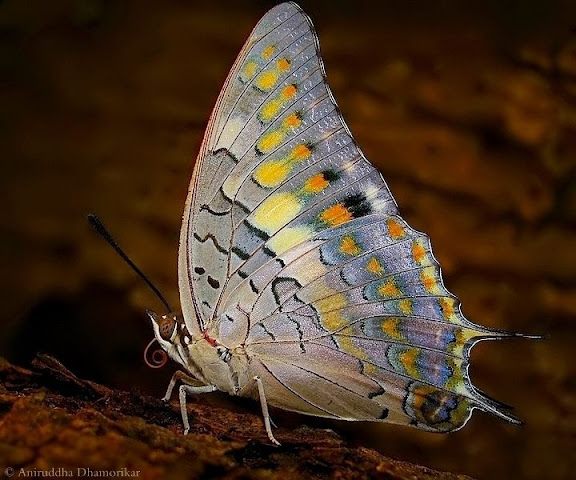 |
| 3. Black Rajah, Charaxes solon Exif: 10/2000sec F3.2 ISO80 at 10.00mm |
P A close-up photograph taken in the above mentioned way will yield a decent background as well as a butterfly that is well in focus. Another way to photograph butterflies is to move away from the butterfly and zooming in. This is not a close-up but a tele-photo. To achieve this, try to keep the plane of lens parallel to the plane of butterfly, in the sense, a tele-photo image with only the head in focus will not yield a sharp image; hence instead of focusing only on the head, try to focus on the entire body of the butterfly (as in Picture 4). This technique can be used for small or large butterflies. Although the background will be considerably blurred, some of the small details of butterfly will be lost due to lower sensitivity of point-and-shoot sensors.
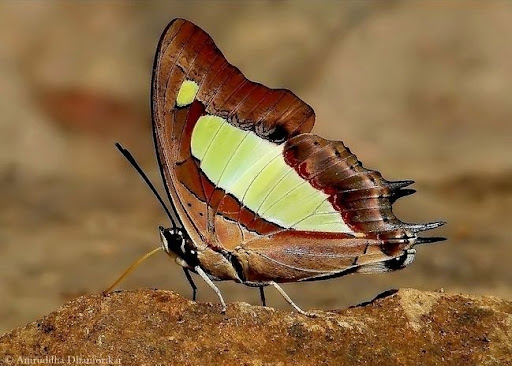 |
| 4. Common Nawab, Polyura athamas Exif: 10/2500sec F4.5 ISO80 at 78.00mm |
As you start photographing more and more butterflies, you will come across many opportunities for action photographs, such as a butterfly feeding on a flower without actually landing on it, engaging in courtship display or laying eggs. Such images are not only excellent records, but they tell a story. Always aim for such images. If you see a butterfly that was laying eggs fly away, stalk it from a distance to see it if lays eggs again – this is a great opportunity to photograph one in action. Some butterflies are especially friendly, and will even sit on you. They are only seeking salts on our skin, but it is a great opportunity to photograph them up close (as in Picture 5). If you come across a school of butterflies mud-puddling on damp ground, set the camera on the ground, or lay flat to be eye-level with the butterflies and take a tele-photo shot as mentioned above – this will make a better composition compared to taking a photograph from a height. There are some easy artistic ways in which you can photograph butterflies. It is quite hard to photograph a butterfly in flight using a point-and-shoot, but by composing images such as a backlit butterfly or in the setting sun adds some value to an otherwise usual shot.
As a naturalist, someone who is keen about a butterfly is also keen on its lifecycle, hence photographs of caterpillars and their host plants might help you cover the entire life cycle of a butterfly – from mating, laying of eggs to caterpillars pupating and metamorphosing.
While butterflies are abundant during their season as discussed previously, they are quite widespread, hence you might have to cover a large distance if you aim to photograph several a day, but there is a trick to attract butterflies to us – by luring them in. Butterfly baits are much like bird feeders. The most basic is to plant native plants that attract butterflies to feed on flowers or to lay eggs. Another way is by putting out decomposing fruits such as bananas, pears and so on. Some butterflies might just be interested in damp grounds, or some on slightly sprinkled liquor! These are some of the basic ways in which to attract butterflies. It is completely safe to do so, and a great opportunity to photograph them.
 |
| 5. Silvery Blue, Glaucopsyche lygdamus Exif: 10/4000sec F4.5 ISO80 at 10.40mm |
Enjoy chasing butterflies, for your photograph might inspire someone to connect with wildlife and conservation!
Nice article. Superb Pics. Your crisp and fine pics of Butterflies will be of immense use for the students of Biology ( particularly those studying Butterflies ) to understand the anatomy and morphology in a very effective ways. Good Luck for future..
ReplyDeleteM C Pargaien
Triple Like :)
ReplyDeleteVery well written, though I thought a trifle long. Would help if you break this up into sections. I am so in agreement with the last part of your post. I stay in Mumbai and am lucky to be in a location which has some wood cover still left.
ReplyDeleteThank you Bernard. I did try to keep it short :)
DeleteGreat tips! Certainly will help in my photography journey. The pictures are gorgeous as always.
ReplyDelete